Showing posts with label Home Dec. Show all posts

Tuesday, February 26, 2013

Soccer Jersey Quilt

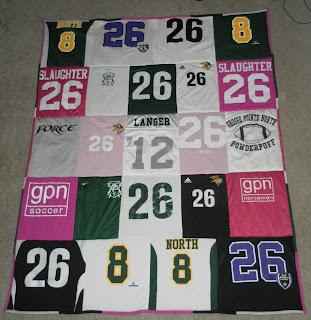
It may be two months since Christmas has come and gone (already???) but I wanted to show off some work I did. Last Christmas I made my first quilts for my aunt (check them out here- My First Quilts) and I was telling a co-worker about it. She got pretty excited because her daughter played soccer, pretty much her whole life. So she had a ton of jerseys laying around the house. So she asked if I could come up with a design for a quilt she could give her daughter for Christmas. 
And here it is...


Quilts are a lot of work, and after many, many tries at different layouts, I love the way this one turned out!
It was tough to figure out how to put together the black, green and pink to make them look cohesive, but I think it works.

So if you have a lot of jerseys hanging around, think about me next Christmas :)

Enjoy
~JV
www.facebook.com/sewingpassion
Thursday, December 20, 2012

NoteBook Pot Holders 2

Alright so I didn't realize it had been so long since I have posted anything. I don't want to do that again so I hope I can stay on top of things. I'll have a lot of Christmas presents to post in the next month :)

With that being said, I wanted to show more of a project I am continuously working on for a client/friend. If you take a look back at the Notebook Potholders post you'll see two styles of potholders I created for Miranda of Inner Circle Photography (http://innercirclephotography.com/). She is so creative and loves to do unique things for her clients. These are just some different looks I made.

Her "colors" (what she uses on her website, logos, etc) play into the fabrics I choose. I'm lucky that she gives me creative freedom and I get to use all kinds of different fabrics and bindings.  Brown, teal, navy, and even pink can be incorporated into the style.

The front is a bleached cotton fabric with rows of blue and pink stitching to imitate the lines of a notebook. The names are hand embroidered (for anyone familiar with my handwriting it's pretty obvious). The back fabric is the different fabrics I get to choose. It also has a thermal-fabric layer to help keep your hands from getting hot.


Ok now that I feel better about myself, we'll leave it at that. Enjoy!!

Stay tuned for all of the presents I made!!!!


~JV

Monday, July 16, 2012

Bridal Shower Gift

This weekend was a busy one. On Saturday I had a full day of events for one of my best friends. She is getting married in October, and since she lives out of state, we threw her bridal shower and bacherlorette party on the same day.

When it came to her shower gift, I knew I wanted to be creative with it. I bought her a serving tray, utensil holder, and towels for her kitchen. With a little suggestion from my sister, I decided to make her an apron to go with the kitchen stuff I bought her. She's a neutral kind of girl so I based the fabrics off of that, but added a little pop of color to keep it fun. The pattern also was just a design for the lower half, so I had to add fabric to cover the top, with an adjustable strap. It also has darts to fit better around the bust.
 
Full View with bow tied at the front
 
View of side pocket
Button is decorative, pocket opens behind ruffle
The button is made from recycled materials, which is perfect for her. She is very environmentally friendly and conscious of what she does in that aspect. So I thought that was a nice personal touch.

Closer View of Front


Simplicity 0384 View B
Lower Half View

I enjoyed putting this together for her, and I know she appreciates a homemade gift :)

~JV

Update: Here's the post of the apron I had made for my sister in April, View C without a bodice
Floral Apron

Wednesday, May 30, 2012

Notebook Pot Holders

At the end of the past few months I think to myself "I'm so glad this month is over. Next month will be much more relaxing." Let me tell you how wrong that is. It would be nice to have a little break, but I'm living the life of a freelance designer; there's always something to work on. I'm not complaining though, because I am so grateful for the opportunities coming my way.

I've just finished with a few major projects I've been working on, so now it's time to move on. Today's post is about some potholders I've made, and now will be my next project to continue working on. If you remember, I had made some a while back for myself (Check it out here). Those were a test run for the ones I made for a client/friend. Miranda of Inner Circle Photography (http://innercirclephotography.com/) asked me to make "Notebook Potholders" for her clients (how cool is she?!?). I happily obliged and set to work for two clients.

The front is a bleached cotton fabric with rows of blue and pink stitching to imitate the lines of a notebook. The names are hand embroidered (for anyone familiar with my handwriting it's pretty obvious). The back fabric is where you can get creative with your fabric choice. We went with fabric that matches her colors on the website. It also has a thermal-fabric layer to help keep your hands from getting hot.

Lana + John: Striped Fabric
Front View
Lana + John: Striped Fabric
Back View
JoJo + Matt Paisley Fabric
Front View
JoJo + Matt Paisley Fabric
Back View
Front View of Both Styles
Back View of Both Styles
I love these! Miranda has given me more names so I'm excited to shop around and see what other fabrics we can use. They are such a unique gift and it shows just how much Miranda cares for her clients (and how creative she is). 
If you want some potholders you may just have to get your picture taken :)

~JV

Monday, May 7, 2012

Music Letters

Every two months new classes come out for the sewing courses. Sometimes the classes repeat themselves and that's the case for the Teen Sewing 101 class. The pattern was letter pillows and it was for January through April. I had the final class with this project last weekend.

Any samples I make for the class where I buy the supplies I obviously get to keep. Most of the time they are clothes that I'll alter and wear at some point so I don't mind. For this project, I couldn't really figure out a word that I could make that would look appropriate for my apartment. So I asked my sister if one of our younger cousins might want their name or something. That's when my 20 year old sister said "Make them for me!!!" How could I refuse? :) So she wanted me to make the pillows spell out MUSIC. She loves to sing and it's a theme she had in her room.

They are individual letters (although you could hand stitch them together if you wanted) and about a foot tall. Every letter was included in the package so the sky's the limit when it comes to the words someone wants made.

All of the letters in order
 Here are the individual shots of each letter.


I asked my sister for a picture of the letters so I could blog them, and she took one right after I had gotten my pictures, so I wanted to include her picture too

I had to hang on to them for four months so now she was finally able to take them home and set them up in her room. Wonder where she'll put them?

~JV

Friday, March 16, 2012

Living Room Pillows

As I've said before, I teach sewing classes at JoAnn's. I've been trying to post pictures of the projects we've done in class. Tonight I'm posting two styles of pillows we've created. The first one (felt flower) is for the March/April classes, and the second (swirled print, double layered) was for the January/February classes.
The students only get to make one in the class but I decided to make two of each for my own sake, to go in my living room. The colors match a beautiful landscape painting I have on the wall.

The pillow from the Jan/Feb class is a double layered design with the pillow form basically sandwiched between, with a stitching encasing it. I used a black/tan swirled print fabric on the outside and a plain cotton fabric on the inside, matching one of the outside color.

This picture shows one of the corners folded down so you can see the inner fabric.

This pillow is from Simplicity Pattern 9873 View A, Sewing for Dummies :)


The felt flower pillow for this month and next is one that I really love. Such an easy way to add some flair to your pillow (I'm thinking of adding a button or something to the center of each). 

A close up view of the felt flower, it has 7 circular layers, one on top of the other (kind of a pain to sew as the layers get thicker)

This pillow is from Simplicity Pattern 1933 View A
I love the other pillows in this package as well. Although I've been told I have enough pillows as it is :/

~JV

Tuesday, February 28, 2012

Fun Pot Holders

I'm going to be making some pot holders for a friend and of course I needed to do some examples to make sure I knew what I was doing. The instructions I followed are from the blog Skip to My Lou 

I used scrap fabric I had hanging around the house, bleached muslin, and created the lettering using black embroidery floss. 
The best part of the project is the "lined paper" look of them. It's created by stitching blue lines across horizontally and a red line on the left vertically. Put any message you like :)
Front Views of both pot holders

Back Views of pot holders
Don't mind the binding, they are "prototypes" :)

The blog I followed had a cute saying so I wanted to add funny little phrases for each pot holder.


I think they are super cute and pretty simple to put together. They could be made from so many different fun, crazy, unique prints and the sky is the limit when it comes to what you want written on them!!

Hope you like them as much as I do :)

~JV

Saturday, January 21, 2012

My First Quilts

As my previous post stated, most of my December consisted of making presents for Christmas. That also included making a few for others to give their loved ones. These quilts were made for my aunt to give her two oldest sons for Christmas. They are the first quilts I ever made and I think I did a pretty good job :) 

They were both made from old hockey jerseys that they had laying around. The binding was created using extra fabric cut from the jerseys. 
#1

#2

The backing I used on them was a black fleece. I just wanted something that would keep the boys warm and the black went with the colors of the jerseys I used.

I love how they turned out!!!!

~JV

Thursday, August 4, 2011

Mixer Cover

Well after a month of blogging about dresses, I wanted to throw something different into the mix. I'm that person who likes to make people gifts for birthdays and such. Yes I'll probably end up being one of those ladies who give funny little gifts to her nieces and nephews (and even my own children) and they'll say "Thanks!" with a fake smile. Hopefully I can make trendy things they would like :) 

Anyways, I decided to make my sister a mixer cover for her KitchenAid mixer. She is baker and makes delicious cupcakes and goodies. Her kitchen and kitchen tools were all pink so I found some cute fabric and floral print to match it. And it is reversible with a batting in the middle, which was interesting trying to figure out how to put together.
The pink side has two pockets and a flower cutout (from the floral print) stitched on the large pocket. 
It also has some ribbon stitched on the edges of the pockets.

I did some outlining with embroidery floss on the flower for a more personal touch.

The floral side also has two pockets. I used a white bias tape on the edges of the pockets. I also made piping to put on the other edges of the cover.
I love this print and was really excited to use it for something. I think I have a good amount of it left. Enough for a dress? We'll see.

I really enjoyed making it for her. She loved it (unless she had that fake smile haha). I've wanted to make a cover for both my mom and brother so maybe this post will inspire me to make them.

~JV