Showing posts with label Self-Design. Show all posts

Friday, May 10, 2013

Baby Shower Gifts- Special Gift

One week ago the cutest baby boy entered into this crazy world. My nephew Zachary is finally here and the whole family is over the moon! We love him so much!

I'm happy I was able to make all sorts of projects for him, and for my brother and sister-in-law, to use. This gift is one that I am especially proud of. My sister-in-law saw a diaper bag that belonged to a friend of hers and wanted one for herself and my brother. It was made from an Air Force desert flight suit. I gladly accepted the project, seeing it as a special challenge in trying to figure out how to cut and take apart a flight suit, and put all the pieces together to make this bag.

I knew as soon as I got the suit, that I wanted to use as many pockets and zippers as I could. She also wanted to keep the Velcro at the top, so they could inter-change any patches my brother has. With that in mind, I took my scissors and seam ripper and went to town. After carefully mapping out the pattern pieces, I got to work, and this is what I ended up with...
 
Front View: Front Flap with Two Pockets with Zipper closure
These pockets were the front chest area of the flight suit. The center was where the front zipper was located.

Front Top View: Velcro Pieces where Patches can be inter-changed; Zipper Pockets
Again, the Velcro was already attached to the front chest of the flight suit.

Back View: Back Pocket with Velcro Tab Closure
Strap with contrast fabric
The emblem on the tab was on the sleeves. I also used one on the front Velcro tab (but you can't see it)

The inside fabric I chose is a neutral color pallet, that way my brother could use it :)

Under the front flap, the bag has another zipper pocket (you can see it on the right)
The sides have pockets as well. One is an open pocket with elastic that you could put a bottle in.
The other has a zipper pocket that I took from one of the pant legs.
 
The inside has two pockets on each side.
There is also a stabalizing piece in the bottom to help keep it flat.

If you haven't already, check out the other gifts I made!

I can't wait to make more things for him as he gets older <3

Enjoy
~JV

Tuesday, February 26, 2013

Soccer Jersey Quilt

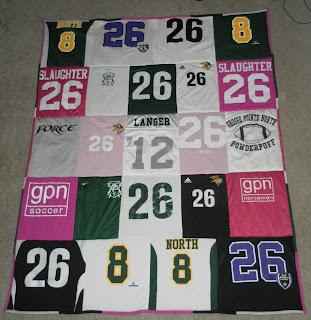
It may be two months since Christmas has come and gone (already???) but I wanted to show off some work I did. Last Christmas I made my first quilts for my aunt (check them out here- My First Quilts) and I was telling a co-worker about it. She got pretty excited because her daughter played soccer, pretty much her whole life. So she had a ton of jerseys laying around the house. So she asked if I could come up with a design for a quilt she could give her daughter for Christmas. 
And here it is...


Quilts are a lot of work, and after many, many tries at different layouts, I love the way this one turned out!
It was tough to figure out how to put together the black, green and pink to make them look cohesive, but I think it works.

So if you have a lot of jerseys hanging around, think about me next Christmas :)

Enjoy
~JV
www.facebook.com/sewingpassion

Friday, January 18, 2013

Scarves for Christmas

 Today's post is about some scarves I made as Christmas presents for a few people.
I obviously love making things for people as gifts and this year was no exception.

Here are all of the scarves I made this year... 
Pink Polka Dot- Jessica (sister)
We did Secret Santa for the siblings this year and Jessica was who I was buying for.  I made this as an extra gift, but it was a dead give-away when it was time for her to guess who her Secret Santa was :)  

Multi-Color Floral- Erin (sister-in-law to be)

Yellow/ Gray Floral- Heather (friend)

Blue Floral/Dot- Mom

Brown Plaid- Mother-in-Law to be

You can check out other scarves by looking through the Accessories Label on the right side of the page.
Or you can follow this link Accessories

Enjoy
~JV
https://www.facebook.com/sewingpassion

Tuesday, August 28, 2012

Purple "Express" Vest

This is a post I've been sitting on for a while, and I decided (since I have to urge to post something) to share this one. Especially since I'm wearing it today :)

This is a project I worked on when I was in school. One of my classes gave us a team assignment to design a line of clothing for Express. In teams of 5, we had to create a cohesive collection of 10 articles of clothing (2 per person). It was a long project that we had to put a lot of work into, but it all turned out beautiful. We also had an end of the semester fashion show in which all of the teams, from each class, showcased their collections.

I created a pair of pants (that I wore for the show, we ended up rolling up the bottom) and a purple, button down vest. The pants are a gray linen with a zipper closure, belt loops, with pockets. The vest is a pretty simple design that hits just below the hips, with four buttons to close in the front.

Front View of Collection
All the ladies, besides the girl in the gray dress on the left, were part of the group
The last member found a model to wear one of her outfits

Side View of Collection

View of Vest with Complete Outfit
This vest is what I am wearing today. I love the color and simple design. I wear it quite often and love how many things I can pair it with
Front View- Open

Front View- Buttoned

Back View

It was such a fun project to work on. It was a little stressful at times (especially since I was the group leader), but the final look of the collection was something we were all happy with. It's definitely a memory I'll have forever.

~JV

Tuesday, August 7, 2012

Bridal Shower Apron

A couple weekends ago, I went to another bridal shower, this time for my sister's best friend. Two bridal showers in one month can be overwhelming (especially on the wallet). But it's all worth it when you see how happy the couple is with your gift, and with each other, of course :).

This shower gift was the one my sister had suggested I make for the wonderful bride-to-be. And I took that suggestion to make the first shower gift (check it out here) which was earlier in the month.
This one I wanted to go with a vintage look and incorporate some of her favorite colors. My first idea on how to choose the colors was to look at the registry. I ended up buying some Moroccan style bowls that were blue, yellow, and red, and used that as my inspiration. But of course I started to second guess myself as I was fabric shopping, so I asked my sister what colors to use. Wouldn't you know it, she said to go with something like an aqua blue and mustard yellow. Of course that matched the look of the bowls :)

I didn't want to make it matchy-matchy with the bowls, so I stuck with the colors but went with this beautiful floral/bird print fabric.  The yellow fabric is a floral print, and the blue has a textured tiling look to it. The pattern is for the lower half of the apron so again I decided to add a top half, with an adjustable strap. It also has a tie strap that you can create a bow in the front, or leave it in the back. The lower scalloped edges have buttons to hold them in place. The top four buttons are blue, and the bottom four are yellow.

Front View with Top Added
Adjustable Straps & Bow

Close Up View of Front, with Bow

Closer View of Front with Buttons (Yellow and Blue)

Side View with Bow

Tied up and ready to be wrapped
Simplicity 0384 View A
I really love how this one turned out. My favorite color is blue and I'm in love with all of the prints of the fabrics. I was tempted to keep it myself, but I don't do much in the kitchen :)

I know she loved it and now she has the perfect accessory to wear while making delicious appetizers :)

~JV

P.S. Sorry for the phone pictures, the boyfriend took the camera when I needed it most :)

Monday, July 16, 2012

Bridal Shower Gift

This weekend was a busy one. On Saturday I had a full day of events for one of my best friends. She is getting married in October, and since she lives out of state, we threw her bridal shower and bacherlorette party on the same day.

When it came to her shower gift, I knew I wanted to be creative with it. I bought her a serving tray, utensil holder, and towels for her kitchen. With a little suggestion from my sister, I decided to make her an apron to go with the kitchen stuff I bought her. She's a neutral kind of girl so I based the fabrics off of that, but added a little pop of color to keep it fun. The pattern also was just a design for the lower half, so I had to add fabric to cover the top, with an adjustable strap. It also has darts to fit better around the bust.
 
Full View with bow tied at the front
 
View of side pocket
Button is decorative, pocket opens behind ruffle
The button is made from recycled materials, which is perfect for her. She is very environmentally friendly and conscious of what she does in that aspect. So I thought that was a nice personal touch.

Closer View of Front


Simplicity 0384 View B
Lower Half View

I enjoyed putting this together for her, and I know she appreciates a homemade gift :)

~JV

Update: Here's the post of the apron I had made for my sister in April, View C without a bodice
Floral Apron

Wednesday, March 7, 2012

Vintage Blouse

I'm going to start off by saying my Grandma's basement is one of the best places to find awesome vintage clothing. That being said, when I visited her last Friday, I came home with a bag of clothes. Love it!! One of the pieces she gave me was a beautiful kimono style turquoise, blue, and brown print blouse.  My favorite colors.

Front

Back with keyhole button closure at neck

I was going out on Saturday for a friend's birthday and decided why not add just a little bit of a new design to the shirt. I needed to do something fast so I added elastic shirring to the waist. I had looked at a shirt I liked that had a shirring around the waistline so I used that as my inspiration for the quick redesign.

 The elastic shirring is a quick stitch with thread in the top of the machine and elastic thread in the bottom. It automatically gathers up the fabric. I did 10 lines of this stitching under the bust and across the waist.
Front

Back

Close up of shirring

I love it and love that it was so easy to remake. Now I have to figure out what to do with the other clothes.
~JV

Monday, January 30, 2012

Close up of Bridal Show Dresses

Here are some pictures that go along with the Bridal Show from Jan 29, 2012

My original idea was to take an old wedding dress and reconstruct it to showcase that I can remake a mother's/grandmother's weddign dress for a bride. But when I was looking they either didn't have enough material or details to work with, or they cost way more than I was willing to spend. So I decided to make a bridesmaids dress instead.
I bought a light pink layered dress at the thrift store for about 3 dollars.
Front view
The dress had multiple layers as well as long sleeves and a few other details
Shoulder lace detail
Buttons on the sleeves
Front view
I kept it more simple in the front because you'll see that the back is quite detailed
It has a gathered waistline as well as gathered on the sides.
This was the first "draft" of how the back looks. It ended up not having the extra fabric connecting the lace and the bodice, the lace directly connected to the bodice. The buttons are from the sleeves and the lace from the shoulder. I really liked how this dress turned out even though I made it so last minute. And I got a lot of compliments (which always makes you feel good)

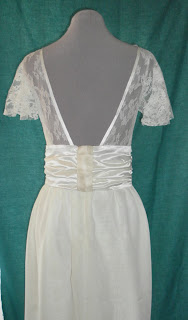
This vintage inspired wedding dress was designed mostly by playing with the lace a bit and keeping a simple design with a few beautiful details. The lace was an old fabric my mom had forever (so I guess it is vintage). and the only fabric I had to buy was the chiffon for the skirt.
The front has a high neckline to offset the design in the back. The sleeves are a short flared style which could be altered if the bride wanted a cap or even "tank" style. The belt is removable and gathered in four sections and connects in the back.
If you look at the blog about the actual show, you'll see that the skirt is a three layer design. It is sheer at the bottom so you'd be able to see your shoes. Again that's a detail where I could lenghten the underskirt to cover the shoes.
For the back I wanted to create this beautiful deep V design to showcase the bride's back. It's a design feature that isn't too elaborate but sure does make a statement. I absolutely love how it turned out.

Hope you enjoyed these close-ups!

~JV

1.29.12 Bridal Show

Yesterday was my first ever bridal show. It was through Unique Weddings and Events. It was at the Shriner Silver Garden Center (beautiful venue uniquely structured building with so much space inside). I was in the main room with about 20-some other vendors. And there was a stage set up where they had a fantastic fashion show.
I showcased the two wedding dresses I had made previously and then also a new gown, a new bridesmade dress and an older "bridesmaids" dress (which was actually a dress I wore for my brother's wedding). 
Here is a picture of my table, my sister modeling, and myself.
I had pictures of some of my creations, a portfolio, comment cards, business cards, and also some fruit snacks for those health conscious brides :)
I am also wearing a bridesmaids dress I created from an old dress I found at a thrift store. And I am standing next to the lasted gown I created, a vintage lace inspired gown.(I'll blog about these two dresses next)

A close up of the vintage/lace dress
A close up of the first wedding dress I made
Me and my fans!
Thanks for coming out in the blizzard.

The experience was something new, scary, and exciting. I was super nervous the days before and even while I was there. We had expected a lot of people but the weather was pretty bad which prevented us from having as many brides as we wanted. When I think it over, I'm ok with it having been slow, that way I was able to see how bridal shows work without being overwhelmed by a million brides.

It was a learning experience and now I am able to see exactly what I need for the next show. I'm thankful I had my family and friends there to support me and encourage me. They back me up (and man the table when I want to eat something).

Now I just have to come up with more dresses to showcase at the next event!
~JV

Wednesday, January 25, 2012

Sneek peek


This weekend is an exciting time for me. I will be attending my first bridal show as a vendor. I'm not sure what to expect or if I'll even get any clients from it but I am sure that it will be a great learning experience for me. So wish me luck :)

The event is being run by Charlene of Unique Weddings and Events, whom I do freelance work through. She is a big promoter of helping local up and coming businesses (although I wouldn't quite say I have a business yet). She will be doing four bridal shows this year and her first is "All About the Dress" 

Shriners Silver Garden Events Center of Southfield, MI
January 29, 2012 12pm to 4pm
Check out more information at the website
and also in The Knot (Michigan)


I have been trying my hardest to get more dresses done to display at the show but have been so busy I haven't quite made as many as I would have liked. But I keep telling myself I have three more shows this year to display my skills. I had started to make these beautiful flowers to add to a dress but haven't gotten to it. So instead I am going to pin them around my booth to add a little flair.
 I will definitely end up using them on a dress so I'll put that up as soon as I make it.

And the future shows are as follows (I'm really excited about the last two)
April 29, 2012 "Brides Just Wanna Have Fun" Carpathia Club, Sterling Heights
August 26, 2012 "Moroccan Theme" Eastern Market Sheds 3+4, Detroit
October 21, 2012 "Tying the Knot" Detroit Princess Boat

I'll let you know how it goes and have some photos too!!!

~JV

Saturday, January 21, 2012

My First Quilts

As my previous post stated, most of my December consisted of making presents for Christmas. That also included making a few for others to give their loved ones. These quilts were made for my aunt to give her two oldest sons for Christmas. They are the first quilts I ever made and I think I did a pretty good job :) 

They were both made from old hockey jerseys that they had laying around. The binding was created using extra fabric cut from the jerseys. 
#1

#2

The backing I used on them was a black fleece. I just wanted something that would keep the boys warm and the black went with the colors of the jerseys I used.

I love how they turned out!!!!

~JV

Thursday, November 3, 2011

Floral Shirt and Blue Jacket

I'M BACK!!!! I've finally got internet at my place and I'm ready to get back to blogging. This is something I've been wearing quite a bit for work (mixing it up with different pieces). The jacket was made from a Cynthia Rowley Simplicity pattern. The shirt I designed myself by draping on my dressform.

Front                                                       Back
I love the dark blue cotton fabric that mutes the print of the shirt but also shows some of the detail of it by having a sheer effect on the back. It's a simple wrap design with a belt that ties around the waist twice to a bow in the front. It's a great jacket to mix up with different pieces in my closet. 

Front                                                    Back
When I was designing this shirt, I wanted to create a neckline that would show from the front of the jacket. I also wanted to make sure it could stand on its own. I like the look of a layered ruffle with a cascade down the front. The print is more busy than I usually wear so I decided a simple design of the actual shirt was best. The cap sleeves have a single ruffle around the edge.

Simplicity- Cynthia Rowley 2250

Here's hoping I keep at it!!

~JV