Showing posts with label Freelance. Show all posts

Tuesday, February 26, 2013

Soccer Jersey Quilt

It may be two months since Christmas has come and gone (already???) but I wanted to show off some work I did. Last Christmas I made my first quilts for my aunt (check them out here- My First Quilts) and I was telling a co-worker about it. She got pretty excited because her daughter played soccer, pretty much her whole life. So she had a ton of jerseys laying around the house. So she asked if I could come up with a design for a quilt she could give her daughter for Christmas. 
And here it is...


Quilts are a lot of work, and after many, many tries at different layouts, I love the way this one turned out!
It was tough to figure out how to put together the black, green and pink to make them look cohesive, but I think it works.

So if you have a lot of jerseys hanging around, think about me next Christmas :)

Enjoy
~JV
www.facebook.com/sewingpassion

Thursday, December 20, 2012

NoteBook Pot Holders 2

Alright so I didn't realize it had been so long since I have posted anything. I don't want to do that again so I hope I can stay on top of things. I'll have a lot of Christmas presents to post in the next month :)

With that being said, I wanted to show more of a project I am continuously working on for a client/friend. If you take a look back at the Notebook Potholders post you'll see two styles of potholders I created for Miranda of Inner Circle Photography (http://innercirclephotography.com/). She is so creative and loves to do unique things for her clients. These are just some different looks I made.

Her "colors" (what she uses on her website, logos, etc) play into the fabrics I choose. I'm lucky that she gives me creative freedom and I get to use all kinds of different fabrics and bindings.  Brown, teal, navy, and even pink can be incorporated into the style.

The front is a bleached cotton fabric with rows of blue and pink stitching to imitate the lines of a notebook. The names are hand embroidered (for anyone familiar with my handwriting it's pretty obvious). The back fabric is the different fabrics I get to choose. It also has a thermal-fabric layer to help keep your hands from getting hot.


Ok now that I feel better about myself, we'll leave it at that. Enjoy!!

Stay tuned for all of the presents I made!!!!


~JV

Wednesday, May 30, 2012

Notebook Pot Holders

At the end of the past few months I think to myself "I'm so glad this month is over. Next month will be much more relaxing." Let me tell you how wrong that is. It would be nice to have a little break, but I'm living the life of a freelance designer; there's always something to work on. I'm not complaining though, because I am so grateful for the opportunities coming my way.

I've just finished with a few major projects I've been working on, so now it's time to move on. Today's post is about some potholders I've made, and now will be my next project to continue working on. If you remember, I had made some a while back for myself (Check it out here). Those were a test run for the ones I made for a client/friend. Miranda of Inner Circle Photography (http://innercirclephotography.com/) asked me to make "Notebook Potholders" for her clients (how cool is she?!?). I happily obliged and set to work for two clients.

The front is a bleached cotton fabric with rows of blue and pink stitching to imitate the lines of a notebook. The names are hand embroidered (for anyone familiar with my handwriting it's pretty obvious). The back fabric is where you can get creative with your fabric choice. We went with fabric that matches her colors on the website. It also has a thermal-fabric layer to help keep your hands from getting hot.

Lana + John: Striped Fabric
Front View
Lana + John: Striped Fabric
Back View
JoJo + Matt Paisley Fabric
Front View
JoJo + Matt Paisley Fabric
Back View
Front View of Both Styles
Back View of Both Styles
I love these! Miranda has given me more names so I'm excited to shop around and see what other fabrics we can use. They are such a unique gift and it shows just how much Miranda cares for her clients (and how creative she is). 
If you want some potholders you may just have to get your picture taken :)

~JV

Wednesday, May 9, 2012

Facebook Page

A friend suggested I create a page on facebook for people who are interested in my work. That way anyone who isn't a personal facebook friend and/or doesn't know about my blog can follow the page. So I've done just that.

Check it out if you haven't already https://www.facebook.com/sewingpassion

Please Like it so I can have a million followers :) I'll be updating that with any new blogs, news, or exciting events! And you can contact me through that if you'd like any custom work done.

Monday, January 30, 2012

Close up of Bridal Show Dresses

Here are some pictures that go along with the Bridal Show from Jan 29, 2012

My original idea was to take an old wedding dress and reconstruct it to showcase that I can remake a mother's/grandmother's weddign dress for a bride. But when I was looking they either didn't have enough material or details to work with, or they cost way more than I was willing to spend. So I decided to make a bridesmaids dress instead.
I bought a light pink layered dress at the thrift store for about 3 dollars.
Front view
The dress had multiple layers as well as long sleeves and a few other details
Shoulder lace detail
Buttons on the sleeves
Front view
I kept it more simple in the front because you'll see that the back is quite detailed
It has a gathered waistline as well as gathered on the sides.
This was the first "draft" of how the back looks. It ended up not having the extra fabric connecting the lace and the bodice, the lace directly connected to the bodice. The buttons are from the sleeves and the lace from the shoulder. I really liked how this dress turned out even though I made it so last minute. And I got a lot of compliments (which always makes you feel good)

This vintage inspired wedding dress was designed mostly by playing with the lace a bit and keeping a simple design with a few beautiful details. The lace was an old fabric my mom had forever (so I guess it is vintage). and the only fabric I had to buy was the chiffon for the skirt.
The front has a high neckline to offset the design in the back. The sleeves are a short flared style which could be altered if the bride wanted a cap or even "tank" style. The belt is removable and gathered in four sections and connects in the back.
If you look at the blog about the actual show, you'll see that the skirt is a three layer design. It is sheer at the bottom so you'd be able to see your shoes. Again that's a detail where I could lenghten the underskirt to cover the shoes.
For the back I wanted to create this beautiful deep V design to showcase the bride's back. It's a design feature that isn't too elaborate but sure does make a statement. I absolutely love how it turned out.

Hope you enjoyed these close-ups!

~JV

1.29.12 Bridal Show

Yesterday was my first ever bridal show. It was through Unique Weddings and Events. It was at the Shriner Silver Garden Center (beautiful venue uniquely structured building with so much space inside). I was in the main room with about 20-some other vendors. And there was a stage set up where they had a fantastic fashion show.
I showcased the two wedding dresses I had made previously and then also a new gown, a new bridesmade dress and an older "bridesmaids" dress (which was actually a dress I wore for my brother's wedding). 
Here is a picture of my table, my sister modeling, and myself.
I had pictures of some of my creations, a portfolio, comment cards, business cards, and also some fruit snacks for those health conscious brides :)
I am also wearing a bridesmaids dress I created from an old dress I found at a thrift store. And I am standing next to the lasted gown I created, a vintage lace inspired gown.(I'll blog about these two dresses next)

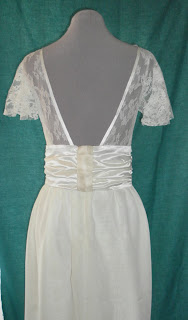
A close up of the vintage/lace dress
A close up of the first wedding dress I made
Me and my fans!
Thanks for coming out in the blizzard.

The experience was something new, scary, and exciting. I was super nervous the days before and even while I was there. We had expected a lot of people but the weather was pretty bad which prevented us from having as many brides as we wanted. When I think it over, I'm ok with it having been slow, that way I was able to see how bridal shows work without being overwhelmed by a million brides.

It was a learning experience and now I am able to see exactly what I need for the next show. I'm thankful I had my family and friends there to support me and encourage me. They back me up (and man the table when I want to eat something).

Now I just have to come up with more dresses to showcase at the next event!
~JV

Wednesday, January 25, 2012

Sneek peek


This weekend is an exciting time for me. I will be attending my first bridal show as a vendor. I'm not sure what to expect or if I'll even get any clients from it but I am sure that it will be a great learning experience for me. So wish me luck :)

The event is being run by Charlene of Unique Weddings and Events, whom I do freelance work through. She is a big promoter of helping local up and coming businesses (although I wouldn't quite say I have a business yet). She will be doing four bridal shows this year and her first is "All About the Dress" 

Shriners Silver Garden Events Center of Southfield, MI
January 29, 2012 12pm to 4pm
Check out more information at the website
and also in The Knot (Michigan)


I have been trying my hardest to get more dresses done to display at the show but have been so busy I haven't quite made as many as I would have liked. But I keep telling myself I have three more shows this year to display my skills. I had started to make these beautiful flowers to add to a dress but haven't gotten to it. So instead I am going to pin them around my booth to add a little flair.
 I will definitely end up using them on a dress so I'll put that up as soon as I make it.

And the future shows are as follows (I'm really excited about the last two)
April 29, 2012 "Brides Just Wanna Have Fun" Carpathia Club, Sterling Heights
August 26, 2012 "Moroccan Theme" Eastern Market Sheds 3+4, Detroit
October 21, 2012 "Tying the Knot" Detroit Princess Boat

I'll let you know how it goes and have some photos too!!!

~JV

Saturday, January 21, 2012

My First Quilts

As my previous post stated, most of my December consisted of making presents for Christmas. That also included making a few for others to give their loved ones. These quilts were made for my aunt to give her two oldest sons for Christmas. They are the first quilts I ever made and I think I did a pretty good job :) 

They were both made from old hockey jerseys that they had laying around. The binding was created using extra fabric cut from the jerseys. 
#1

#2

The backing I used on them was a black fleece. I just wanted something that would keep the boys warm and the black went with the colors of the jerseys I used.

I love how they turned out!!!!

~JV

Thursday, August 4, 2011

Mixer Cover

Well after a month of blogging about dresses, I wanted to throw something different into the mix. I'm that person who likes to make people gifts for birthdays and such. Yes I'll probably end up being one of those ladies who give funny little gifts to her nieces and nephews (and even my own children) and they'll say "Thanks!" with a fake smile. Hopefully I can make trendy things they would like :) 

Anyways, I decided to make my sister a mixer cover for her KitchenAid mixer. She is baker and makes delicious cupcakes and goodies. Her kitchen and kitchen tools were all pink so I found some cute fabric and floral print to match it. And it is reversible with a batting in the middle, which was interesting trying to figure out how to put together.
The pink side has two pockets and a flower cutout (from the floral print) stitched on the large pocket. 
It also has some ribbon stitched on the edges of the pockets.

I did some outlining with embroidery floss on the flower for a more personal touch.

The floral side also has two pockets. I used a white bias tape on the edges of the pockets. I also made piping to put on the other edges of the cover.
I love this print and was really excited to use it for something. I think I have a good amount of it left. Enough for a dress? We'll see.

I really enjoyed making it for her. She loved it (unless she had that fake smile haha). I've wanted to make a cover for both my mom and brother so maybe this post will inspire me to make them.

~JV

Monday, August 1, 2011

Wedding Dress #2

Charlene of Unique Weddings and Events recently opened a new store in April and asked me to design and create another wedding dress to display for the grand opening. I was really excited about it but put it off until the last minute. So basically I had two weeks to design and make this dress. Looks like I pulled it off!

When I designed this dress, I took inspiration from the first wedding dress I created. It is a one shouldered gown with princess seams. The main difference is that the bodice hits at the waist and the ruffles start below the knee. But you can tell that they are definitely not the same dress.

Side view of the top.

I also created a belt to fit over the waist seam. It was my first attempt at hand beading so it is a little scarce, but I still like how it turned out. It snapped close in the back.

Charlene said she wanted a more avant garde look to this dress so I created an exaggerated shoulder detail that flows down the back of the dress. The top of the strap has interfacing in it to keep it stiff and help with the fullness. It was tricky to figure out how to put it all together, but I love working things out, playing with the fabric, and seeing the end result (especially after seeing the failed attempts)

The ruffles are a horizontal design with five tiers. It also has tulle underneath to make the ruffles pop more.

I absolutely love this dress and despite creating it in such a short period of time, I enjoyed every minute of making it.

I'm excited to see what the future holds with opportunities of creating more wedding dresses. I never thought that's what I would get into, but I'm not complaining. It's a lot of fun!!

~JV

Wedding Dress #1

I wanted to end the month of July and the Dresses of Summer with a bang. But I happened to miss the last day of July. No matter, I'll still post some of my favorite dresses.

This first is a wedding dress I designed for a friend who was doing a photo shoot downtown. Miranda Hopkins of Inner Circle Photography is my sister's best friend and a wonderful photographer. She wanted a custom wedding dress and came to me for it. I was very excited to design and create this gown.

It is a one shoulder gown with an empire waist. The skirt has a good number of ruffles cascading vertically down. It hits right at the hip. The bodice is a simple princess seamed style so it doesn't take away from the fullness of the skirt.

These are some of the accessories I created for the shoot. They all have hair clips on them but a couple were actually used as pins on the gown. They were fun to design and put together.

Here are some shots of me cutting a couple inches off the bottom so she didn't trip :)
  
The shoot was at a really interesting building called 4731 Gallery in downtown Detroit.
People thought there was an actual wedding going on.

Just a few photos of everyone fixing the model up to create the perfect shot.

Check out http://projectbride.com/2011/06/10/yellow-blue/ for a full look at the shoot. Gorgeous right?
(Yeah that's me as the bridesmaid)

Also check out Miranda's photography at http://innercirclephotography.com/

I really hope you enjoy this post because this was such a great experience for me. It has helped me network and get my freelance work off to a start. I actually met Charlene of Unique Weddings and Events through this shoot who has been giving me a lot of work.

Enjoy!!!

~JV

Thursday, July 21, 2011

Fuchsia Decor

Just wanted to write a quick post for the night. This one is another freelance design for Unique Weddings and Events. It's been a busy week of late night sewing but I know it's all worth it because they make people happy :)

The bride's colors are fuchsia and orange. The arch has a gathered effect with accents of orange bows and ties. The unity candle table cover is gathered in a pattern to create a draped effect.


 This is actually the second arch cover I've made, the first was a white cover. This fuchsia one has a fuller look to it.

This was for a viewing to confirm the look of the event and the bride loved it. We'll see if she wants me to make anything else.

~JV

Tuesday, July 19, 2011

Draped Panels

Now I know I said July would be a month of dresses but I wanted to post some of the projects I do for my freelance work. Most of the work I do is with Charlene Thompkins of Unique Weddings and Events. She is a wonderful wedding planner who pretty much does anything for her brides. She is so creative and when we get together I know we come up with some great designs.

This past week she had me working on some panels for a wedding this past weekend. Some of the panels were a plain, straight design, but the other panels, she wanted a dramatic draped design. For the draped panels I used elastic to create a gathered effect that in turn created a drape when hung up. I wasn't sure what they would turn out like, but when Charlene texted me the photos I was very happy with the results. She was so excited about how they turned out and she even said the bride cried when she saw the whole look together.

So here are some pictures, sorry if they're blurry, it's taken with a phone.

The panels were spaced out with solid ones on the sides and sheer ones in between.

I love the Tiffany Blue she used for the tables and chair backs.

This is the whole effect of the backdrops I made. I love it and so did all the guests :)

These are the plain panels I created to go behind the DJ. Pretty simple but it adds to the feel of the reception.

Charlene is a great designer, and she works with you from day one to find out what your needs are and she strives to make you celebration the best it can be. If you like what you see from the pictures, please please please email her at uniqueswed@yahoo.com and let her bring out the best on your special day.

~JV